Transferring files from Mac to iPad with Commander One

Transferring files from Mac to iPad using Commander One
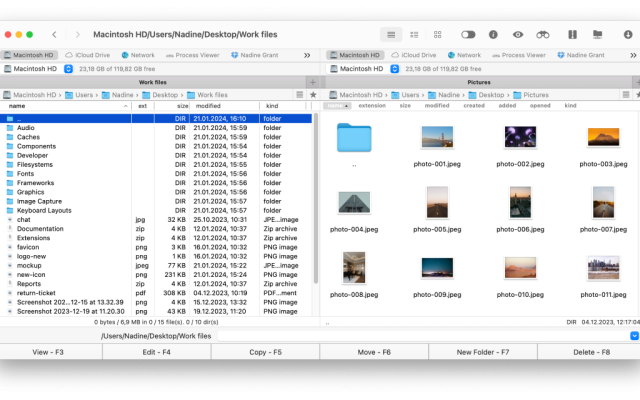
Commander One allows you to access the content of your iPad and seamlessly transfer files between your iOS devices and your Mac computer. All you need is a simple USB cable to transfer files from Mac to iPad. It is the most convenient and easy way to work with the content of your iPad right from your Mac. So how to transfer file from Mac to iPad via Commander One.
1. Connect your iPad via USB to Mac.
2. Search for it in the Finder’s sidebar.
3. Select iPad and click Trust this device.

4. Click Trust this device on your iPad.

5. Reconnect it via a USB cable to your Mac computer.
6. Launch Commander One. Your iPad will be shown as a local drive.
Transfer files from Mac to iPad Using iTunes
File Sharing is a feature in iTunes that helps users transfer file from Mac to iPad and vice versa. The inconvenience of this method is the need to directly connect the iOS device to the laptop. Here is how to transfer files from Mac to iPad via USB.
1. Connect your iPad to your computer with a USB cable and launch the latest iTunes.
2. Click the iPad icon in the upper left corner after discovering it and go to the File Sharing tab from the left sidebar. Applications supported by this feature will be listed in the Applications area.

3. Select the application you want. To save files to iPad, navigate to the files on your hard drive and drag them to the Required Documents area. If you want to download files from iPad, hold Ctrl and select all files with the cursor in the Document area, and drag them to the desktop.
How to transfer files from Mac to iPad wirelessly
Bluetooth is the default solution for transferring photos and videos between different devices. Just connect your Mac and iPad to the same network first, and you can transfer video from Mac to iPad as well as other files. Here is how to move files from Mac to iPad via Bluetooth.
1. Go to your Mac computer and click Apple Menu, then you can click System Settings.
2. Turn on Bluetooth and click it to display Bluetooth Status. Repeat the same operation on your iPad.

3. You will see a prompt from the Bluetooth Setup Assistant. Select your iPad from the list.
4. Go back to your Mac, select a file or files you want to sync.
5. Right-click your choice, select Bluetooth to sync.
6. Select your iPad in the Devices list to start transferring files from Mac to iPad.
Transfer files from Mac to iPad using AirDrop
The requirements for using AirDrop between an iOS device and a Mac are as follows: both devices must be close to each other and support AirDrop, and for the best experience it is worth updating software to the latest version. Devices must have Bluetooth and Wi-Fi enabled. Here is how to transfer files from Mac to iPad using AirDrop.
1. Launch Control Center on your iPad.
2. Press and hold your finger on the wireless control unit, turn on AirDrop, and select Everyone.

3. On a Mac, right-click on the file you want to send to iPad.
4. Select Share → AirDrop.
5. Select the desired iPad from the list, and then the file transfer will start.
6. On iPad, tap Accept and select where you want to save the file to your device.