Add Google Drive to Finder on Mac

thumbnail

When using Google Drive on your Mac, the most common way to access files and folders is by signing into the web app. However, doing so is time-consuming and requires an internet connection. The good news, however, is that easier alternatives exist.

Today, you’ll learn how to add Google Drive to Finder. You’ll learn more about a solution from CloudMounter, too, that lets you use online files as local ones via the Finder app.

The native way with Google Drive for desktop

Google Drive is always accessible from the web app. You just need to open your browser, type the Google Drive website, and enter your Google login details before signing in and accessing your files and folders. 

While this is the norm, though, you’ll probably find it much easier if you treat the service like just another drive on your computer. Setting it up is very easy and doesn’t take much time at all; below is a step-by-step guide to setting it up. Here’s how to add Google Drive to Finder on Mac:

  1. Download the Drive installer for desktop on your Mac.
  2. Open the installation file “GoogleDrive.dmg”.
  3. A new window will open up with a file called GoogleDrive.pkg. Double click this to start the installation.
  4. Set up the Google Drive app, following the on-screen instructions.


You can learn more about the features of this application in the Google Drive help.

Once you connect your account, you can find the top-level Google Drive folder in the Finder sidebar under Locations. If you don’t see it there, look in your home folder, which you can find under your username in Finder.

If you still can’t find it, you need to open the Google Drive settings, find the “Open in Finder” button, and click it.

To place your Google Drive in the sidebar, drag that Google Drive item to the Finder sidebar, wherever you want it to be.

Adding Google Drive to Finder via CloudMounter

While you can use the Google Drive app to add your cloud to Finder, it’s not necessarily the best option. CloudMounter is another great tool offering multiple advantages. For example, you can add an unlimited number of accounts and transfer files between them as if they were regular folders. 

Installing CloudMounter requires significantly less space than the Drive for desktop app, meaning you should have no problems optimizing your storage. Easy to follow the points outlined below:

1. Download cloudmounter.dmg and open this installation file for macOS.

2. Install the app by copying it into the Applications folder.

Download and install CloudMounter on macOS

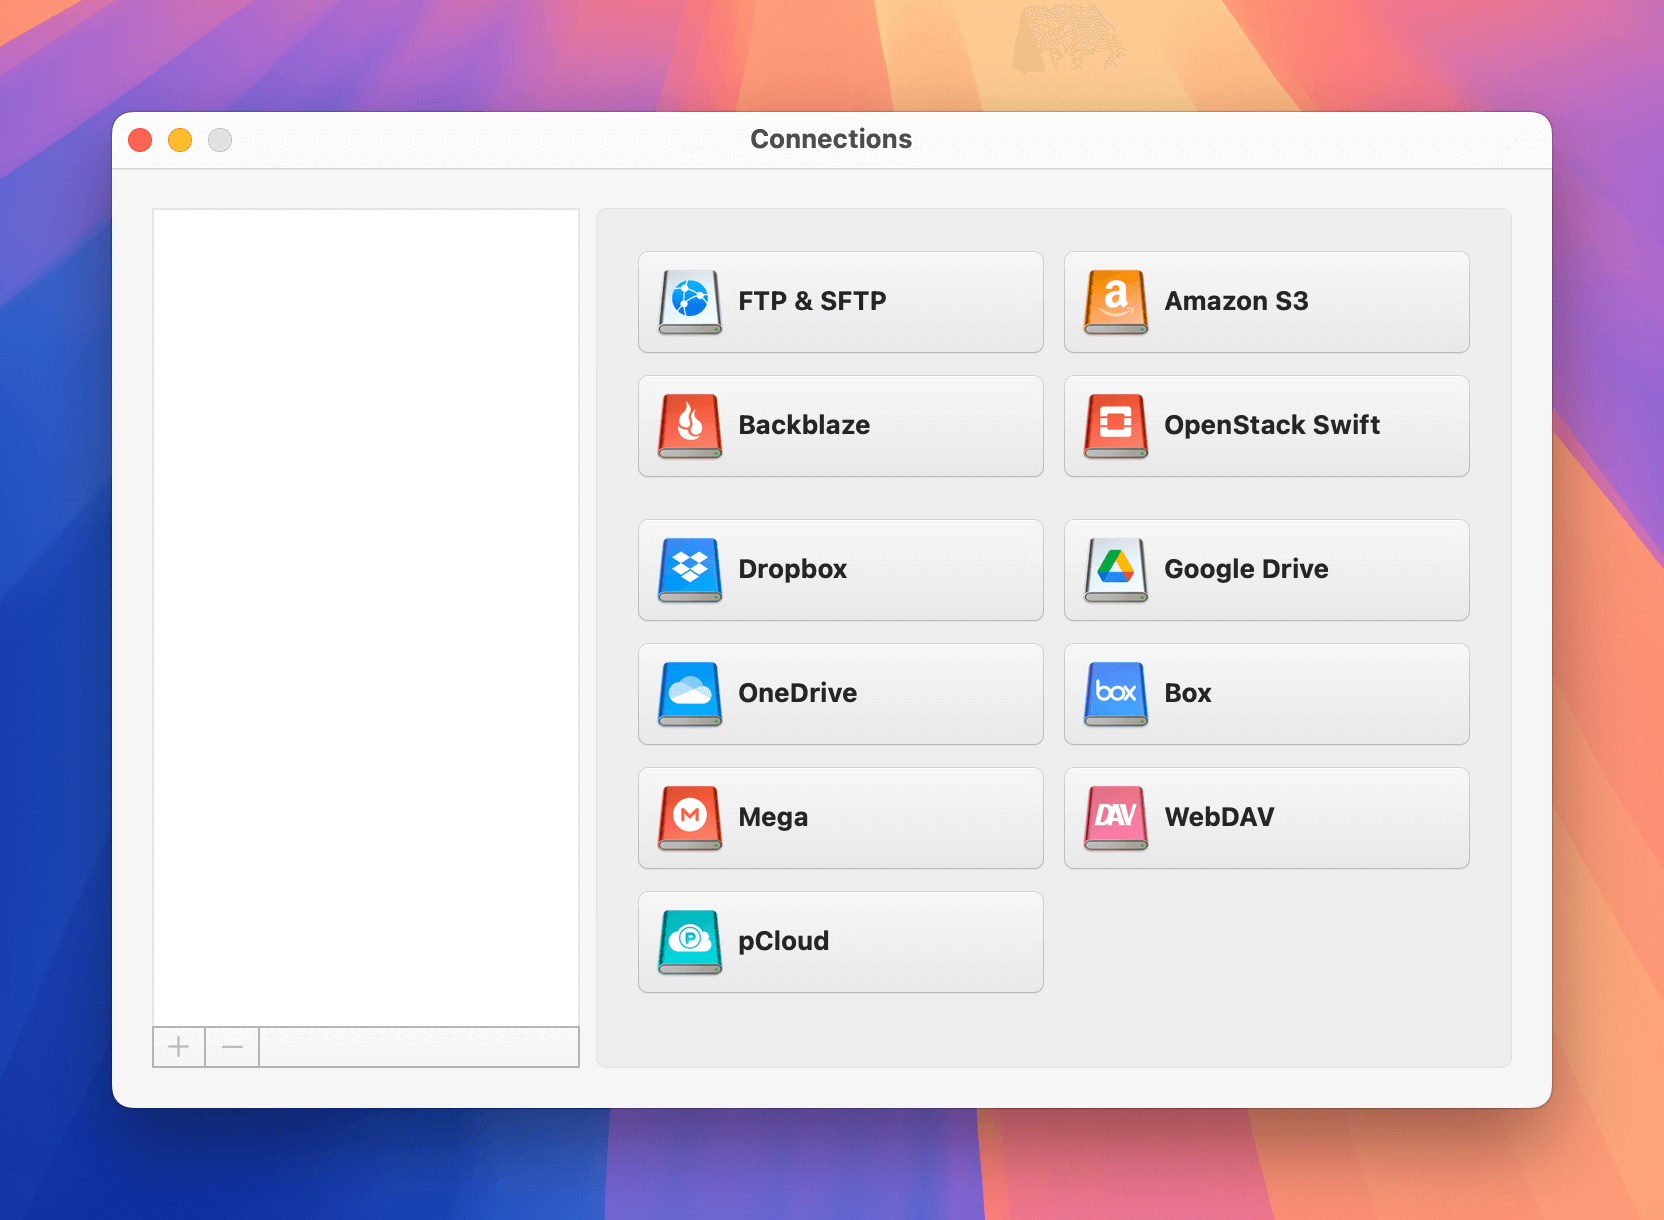
3. Launch CloudMounter and choose the “Google Drive” type of storage.

The connection box in CloudMounter on Mac

4. Follow the instructions in the wizard and click “Mount”.

Set up Google Drive in CloudMounter on Mac

5. The utility will add your Google Drive to Finder.

Google Drive in the Finder's Locations sidebar on Mac

Once you’ve installed CloudMounter and signed in, you can easily open and transfer your cloud files. On top of that, you have the option to delete anything you don’t need. Furthermore, you can organize and edit content like it’s stored locally on your Mac.

What else is interesting about CloudMounter?

CloudMounter is an excellent app if you own several cloud storage accounts or work with remote servers. You do not need to install separate apps, saving space and reducing mental bandwidth. Everything is available in Finder, whether you use Google Drive or something else like OneDrive. 

This, however, isn’t the only benefit. It’s worth keeping in mind each of the remaining and similarly helpful features of this desktop app; they apply regardless of the cloud storage solution you use.

  • Manage files of all your storage seamlessly in a single place.
  • As many accounts as you need, whether with Google Drive or another tool.
  • Support of a manifold array of cloud storage and remote servers.
  • Offline work with online files, meaning you can work on the go at all times. 
  • Client-side encryption provides extra protection for your online data.
  • Suitable for both macOS and Windows, meaning you don’t have to worry about switching operating systems.
Note: Google documents on Google Drive are just links to these files from docs.google.com, not physical ones. It doesn’t store the document’s content, but points to where it can be accessed and edited online. So, you should keep this in mind when accessing them.

CloudMounter handles online documents such as Google Docs and Sheets as links, allowing you to move them between folders. However, copying them to another account will break the links, making the documents inaccessible – so you should keep them within one account. Additionally, moving (not copying) such documents to your desktop or another account will result in their removal from both Google Drive and docs.google.com.

Conclusion

Knowing how to add Google Drive to Finder is an essential step in organizing your online files, and it’s easier to use CloudMounter than the Google Drive app. Besides managing your files and folders stress-free, you’ll also have the opportunity to organize your other drive accounts from a single interface.

CloudMounter offers multiple other advantages, too. For example, you can work offline with files – allowing for remote work on the go. When signing up, you’ll need to make sure that you don’t delete your Google Drive documents by accident.